
You went to cli.github.com, ready to install the GitHub CLI. Maybe you clicked the download button. Maybe you tried running brew install gh. Either way, something didn’t work, and now you’re here.
You’re not alone. The GitHub CLI installation experience is genuinely confusing, especially if you’re new to the terminal. Let’s break down what’s going on and how to actually get it installed.
Why the GitHub CLI website is so confusing
When you land on the GitHub CLI homepage, you’re greeted with a command: brew install gh. Simple enough, right? Except for one problem: most people don’t have Homebrew installed.
If you paste brew install gh into your terminal without Homebrew, you’ll see something like:
zsh: command not found: brewThat’s not an error with GitHub CLI. It means your Mac doesn’t have the Homebrew package manager installed yet. But the GitHub CLI website doesn’t mention this prerequisite at all. It just assumes you already have it.
And if you skip the brew command and click the download button instead? You’ll get a .zip file. Great, you think. I’ll just unzip it and run the app. But when you unzip it, there’s no app. Instead, you’re staring at two mysterious folders: bin and share.
Open bin and there’s a single file called gh with no file extension. Open share and there’s a bunch of documentation files you didn’t ask for. There’s no installer, no drag-to-Applications, no double-click-and-go.
And if you try to double-click the gh file in the bin folder to run it? macOS hits you with this:
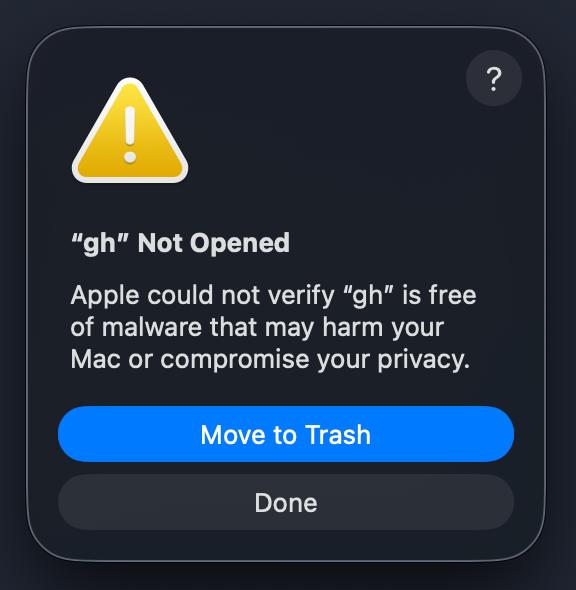
Now you’re not just confused. You’re concerned. Is this file safe? Did you download the wrong thing? The answer is yes, it’s safe, but macOS blocks unsigned binaries by default. The website doesn’t warn you about this, and it doesn’t tell you how to get past it.
To actually use this file, you’d need to right-click it, choose Open, click through a security prompt, then move it to the right system folder, and configure your PATH. None of which is explained anywhere on the GitHub CLI website.
The releases page is even worse
If you follow links to the GitHub releases page, you’ll find 24 different download files for a single version. There are .deb files, .rpm files, .tar.gz archives, versions for amd64, arm64, 386, and source code archives. If you don’t know whether your Mac has an Intel or Apple Silicon chip, or what a .tar.gz file even is, you’re stuck.
There’s no “Download for Mac” button that just works. There’s no guided install. You’re expected to already know which file matches your system.
How to actually install GitHub CLI on Mac
Here are your options, from easiest to hardest.
Option 1: Use Vibestackr (the easy way)
Vibestackr is a free Mac app that installs CLI tools like GitHub CLI without any of the friction described above. No Homebrew prerequisite. No choosing between 24 binary files. No PATH configuration. No malware warnings. (GitHub CLI support requires Vibestackr v1.3 or later. Download the latest version here.)
Here’s the entire process:
- Download Vibestackr (free)
- Open it
- Select the tool you want to install
- Click Install
That’s it. Vibestackr detects your system, installs any missing dependencies, and configures everything automatically. It handles Homebrew, PATH issues, and authentication setup so you don’t have to.
Skip the headache
Download Vibestackr for free and install GitHub CLI (plus AI coding tools like Claude Code) in one click.
Download for MacOption 2: Install Homebrew first, then GitHub CLI
This is the “official” method. It works, but it’s two installations, not one.
Step 1: Install Homebrew
Open Terminal (press Cmd + Space, type “Terminal”, hit Enter) and paste this command:
/bin/bash -c "$(curl -fsSL https://raw.githubusercontent.com/Homebrew/install/HEAD/install.sh)"This will ask for your password and take a few minutes. If your Mac doesn’t have Xcode Command Line Tools installed, it will install those too, which can take even longer.
Important: After Homebrew installs, it may print instructions about adding Homebrew to your PATH. If you’re on an Apple Silicon Mac (M1, M2, M3, M4), you’ll probably need to run:
echo 'eval "$(/opt/homebrew/bin/brew shellenv)"' >> ~/.zprofile
eval "$(/opt/homebrew/bin/brew shellenv)"
If you skip this step, brew still won’t be found even though you just installed it. This trips up almost everyone.
Step 2: Install GitHub CLI
Now you can finally run:
brew install ghStep 3: Authenticate
After installation, you need to log in:
gh auth loginFollow the prompts to authenticate with your GitHub account.
Option 3: Download the binary manually (hard mode)
If you don’t want Homebrew or Vibestackr, you can download the binary directly from the releases page. Fair warning: this is the most confusing option.
- Figure out your chip type: Click the Apple menu → About This Mac. If it says “Apple M1” (or M2, M3, M4), download the
macOS_arm64file. If it says “Intel”, download themacOS_amd64file - Unzip the downloaded file. You’ll see a
binfolder and asharefolder - The actual tool is inside
bin/gh. Ignore thesharefolder - Before you can use it, you need to clear the macOS Gatekeeper warning. In Terminal, run:
xattr -d com.apple.quarantine ~/Downloads/gh_*_macOS_*/bin/gh(adjust the path to match your download) - Move the
ghbinary to a directory in your PATH, like/usr/local/bin/:sudo cp ~/Downloads/gh_*_macOS_*/bin/gh /usr/local/bin/ - Open Terminal and verify it works with
gh --version
If steps 4 through 6 sound like gibberish to you, this method probably isn’t for you. Go with Option 1.
Why is developer tooling still this hard?
It’s a fair question. GitHub CLI is a great tool once it’s installed. But the installation experience assumes you already know things like:
- What Homebrew is and how to install it
- What your system architecture is (amd64 vs arm64)
- How to move binaries into your PATH
- How to edit shell profiles (
.zprofile,.zshrc,.bashrc) - What to do when a command “isn’t found” after you just installed it
None of this is obvious to someone who’s just getting started. And the official documentation doesn’t bridge that gap. It links to external pages, references package managers you may not have, and offers 24 downloads without guidance on which one to pick.
This isn’t unique to GitHub CLI. Most developer tools have this same problem. The people who write the docs already understand the ecosystem, so they skip the steps that trip up beginners.
Common GitHub CLI installation errors
If you’re troubleshooting, here are the most common issues people run into:
“command not found: brew”
You don’t have Homebrew installed. See Option 2 above, or skip it entirely with Vibestackr (Option 1).
“command not found: gh” (after installing)
This usually means your shell doesn’t know where gh is installed. If you used Homebrew on an Apple Silicon Mac, make sure you ran the PATH configuration step. Try closing and reopening Terminal, then try again.
”gh auth login” hangs or fails
Make sure you have a GitHub account. The authentication flow will open your browser. If it doesn’t, try running gh auth login --web and manually opening the URL it provides.
”Apple could not verify ‘gh’ is free of malware”
This is macOS Gatekeeper blocking an unsigned binary. It doesn’t mean the file is dangerous. It means it wasn’t installed through the App Store or a signed installer. To get past it, right-click the gh file, select Open, and confirm in the dialog. Or run xattr -d com.apple.quarantine on the file in Terminal. Or just avoid the whole thing by installing through Homebrew or Vibestackr, which handle code signing properly.
Unzipped the download and found “bin” and “share” folders
This is the expected contents of the .zip download from GitHub’s releases page. The actual gh tool is inside the bin folder. The share folder contains man pages and documentation. There’s no installer. You’re expected to manually move bin/gh to a system directory like /usr/local/bin/. If this isn’t what you were expecting, try Option 1 or Option 2 instead.
Downloaded a .zip but don’t know what to do with it
You downloaded the binary release instead of using a package manager. Unless you’re comfortable with manual binary installation (moving files to /usr/local/bin/, clearing quarantine flags, configuring PATH), try Option 1 or Option 2 instead.
What else can Vibestackr install?
Beyond GitHub CLI, Vibestackr installs AI coding assistants that let you build software by describing what you want in plain English:
- Claude Code by Anthropic, one of the most capable AI coding tools available
- Gemini CLI by Google, a powerful alternative with Gemini’s reasoning capabilities
- Codex by OpenAI, built on GPT models for code generation
Each of these tools has its own set of installation dependencies and configuration steps. Vibestackr handles all of them the same way: pick a tool, click Install, start building.
If you came here trying to install GitHub CLI and ended up frustrated, you’re exactly who Vibestackr was built for. Developer tools should be easy to set up, even if you’re brand new to this.
Ready to get started?
Download Vibestackr for free and skip the installation headaches.
Download for Mac